Release Guide
Release Flow#
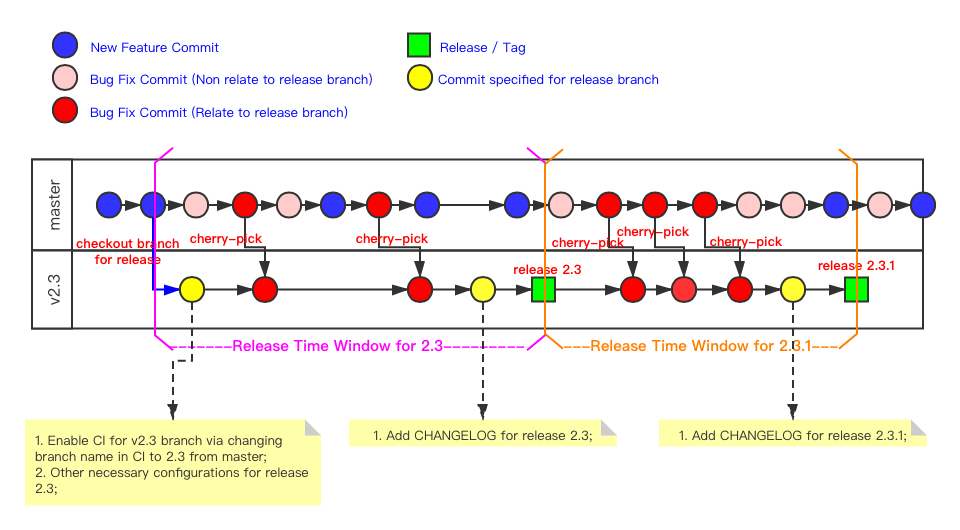
The release flow of Apache APISIX follows GitLab flow, instead of Git flow or Github flow. Furthermore, Release branches with GitLab flow is the preferred way. The chart below will take the release v2.3 of apache/apisix-dashboard as an example to illustrate the details.
The entire flow is comprised of the following four phases.
Planning Phase#
This phase will decide if a feature is ready to be released as well as the release time.
- A new target milestone will be created in Github. (e.g.
2.3). - A discussion will be started on dev mailing list dev@apisix.apache.org for gathering ideas for the next release.
- Maintainer team will then mark the issues and pull requests with the target milestone.
Development Phase#
This phase is for developing new features and fixing bugs.
- Maintainer team and contributors will work on the issues targeted to release milestone.
- Every single new issue is required to be recognized if it should be included in the next release. If yes, the milestone needs to be set for the issue.
Release Phase#
This phase will be throughout the entire Release Time Window.
- A new branch (e.g.
v2.3) for release is created from themasterbranch, which is also considered as the start of the Release Time Window. - Set corresponding configurations for the new release branch, please see the chart above for details.
- As complying with Upstream first, each commit needs to be merged into the
masterbranch first. Afterward, it will be backported to the new release branch if the relevant pull request is with theneed backportlabel attached. - At the end of the Release Time Window, the
CHANGELOGfor the new release will be added. - Tag the last commit and release the assets via the following section GPG Settings.
Maintenance Phase#
Once a version is released, it will enter the maintenance mode and will only accept the security and critical bug patches backported from the master branch. A new version will be released soon after significant bugs got fixed, with patch version increment (e.g. 2.3.1). In this case, all users are recommended to upgrade to the latest release to avoid potential risk to the stability.
GPG Settings#
Install GPG#
Download GnuPG from https://gnupg.org/download/index.html. There are differences between the 1.x and 2.x versions of the GnuPG commands, and the following descriptions are based on the GnuPG 2.x versions.
After the installation is complete, execute the following command to check the version.
Create Key#
Execute the following command to create the key:
GnuPG-2.x:#
GnuPG-1.x:#
Follow the instructions to generate key:
Note: Please use the Apache email address to generate the GPG Key.
View the generated key:#
The example result:
And 30B5FD72 is the ID of pub key
Synchronizing the public key to the server#
The steps are as follows:
pool.sks-keyservers.net is one of the pub key servers, the pub key will be automatically synchronized between each server, just choose anyone.
Add Key Fingerprint to id.apache.org#
get Key Fingerprint
Login id.apache.org and submit Key Fingerprint#
Add your GPG key to Apache svn#
download APISIX svn
Export the public key and append it to the KEYS file.
Commit the modified KEYS file, saving the public key to the svn server.
Make source code package and upload to Apache SVN#
Here's an example of preparing a 1.0 version. Before you make the package, make sure you have branch v1.0 ready on GitHub.
Send VOTE thread to the dev mailing list#
There is a minimum wait of 72 hours before statistical voting results. If you get -1 vote, you need to solve the problem before you can continue. An email example is as shown below.
Send VOTE RESULT thread to the dev mailing list#
Click here to view the reference email at least 3 +1 binding votes is required, then send the vote result to dev@apisix.apache.org.
Move package from dev to dist#
Invite PMCs to move KEYS and package under the release directory.
Update Download page#
The Download page contains links for Apache APISIX, Apache APISIX Dashboard, and other sources, and we need to update its contents here.
Send ANNOUNCE#
Click here to view the reference email send announce email to dev@apisix.apache.org and announce@apache.org